i was out today at a local art show that happens once a year to promote and get money for the local Zoo here. i go for the primate paintings, and i can score a decent one yearly.
but thats not what this post is about.
while there with dear hubby, he points out a display of jewelry , made out of, all things, GIFT CARDS!!
so, i came home and went looking for a tutorial on how to make these things.
found one,


but thats not what this post is about.
while there with dear hubby, he points out a display of jewelry , made out of, all things, GIFT CARDS!!
so, i came home and went looking for a tutorial on how to make these things.
found one,
Gift Card Bracelets
14 JUNE 2009
I’ve seen a lot people making bracelets from their credit cards lately. Well, I just have one credit card, and honestly, it’s kinda ugly, even when cut up in pieces. However, I have noticed that some stores offer some pretty wonderful gift cards that are just asking to be made into jewelry, so I decided to give my own bracelet a try.
I started with this pile of cards. The three at the top are from Hobby Lobby, which always has pretty, seasonal card designs. The handful at the bottom are actually promo American Express clear cards—the only credit card like objects in my stash that looked like they might want to be jewelry. At some point, I’m pretty sure I’ll turn these into a necklace.

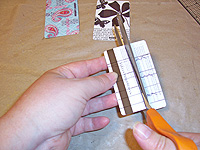
First, I did a little planning with my ruler. I figured I could cut eight pieces from the card by splitting it lengthwise, and then cutting 3/4″ strips from those halves. The little bit leftover removed the writing on the bottom of the card.

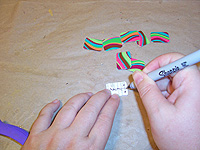
Armed with measurements, I flipped the card over, and drew out some cutting lines using a Sharpie.

Heavy scissors will cut through the cards easily.
The card had rounded corners, so I just used one of those as a guide, and rounded all the straight cut edges. This will keep the pieces from catching on everything in sight when they’re around my wrist.

The card had rounded corners, so I just used one of those as a guide, and rounded all the straight cut edges. This will keep the pieces from catching on everything in sight when they’re around my wrist.
I marked dots for two holes along one shorter edge.

I have a teeny tiny hole punch I use for jewelry, that’s just big enough for a jump ring to slide through. A drill would work for hole punching, too.

I used split rings to join the pieces together. Just place them back to back, and slide the ring through two side holes.

Just keep putting new pieces back to back with the ones joined together, adding links until the bracelet is long enough. I used seven for mine, but probably could have made do with six.

When the bracelet was long enough, I just added a toggle clasp to the ends.
No comments:
Post a Comment